")
")


This is going to be a simple introduction for those who have started CTF challenges just now and wondering what do we do in pwn challenges, what kind of tools are required in this category of challenges, information gathering of a binary, what kind of strategies hackers use in order to exploit a binary. By the way, I am not an expert in this but whatever I know you will get to know in this article.
According to me, Binary Exploitaion is a way to find a way to perfom some task with that binary that it is not supposed to do. In the exploitation, we try various ways to exploit a binary. And belive me, if you want to learn one method, you will need to understand evey word of that method in order to fully understand it. For example, if the method includes GOT and PLT sections, you will need to understand how GOT and PLT sections work, what is the use of these two.
If we are given a binary, we will find the infomation about the binary, about its architechure, about the protections and other details. we can simply use the file command in the linux to find the architecture of a binary
man file
file <binary-name>

The binary I have is ELF 64-bit. the other info is also necessary, like the binary is dynamically linked, which means that the binary is a dynamic library and it is linked to the libc library and that it is not having a library in itself. second thing to notice is that Binary is not stripped which means that the binary is making is more debuggable. if the binary was a stripped binary, you will face difficulties while debugging it cause you won’t see any function names in it, you won’t have a main function to debug.
Actually, you can create you own binary using C/C++ and gcc/clang. There are many flags that if you use while compiling a binary, you can compile a stripped binary, desired architecture, enable/disable protections and various things. By the way, we could also use NASM, ld to get a binary but that it is not necessary while we can use a high level language. Following is the code in C that will just print Hello KingPing.
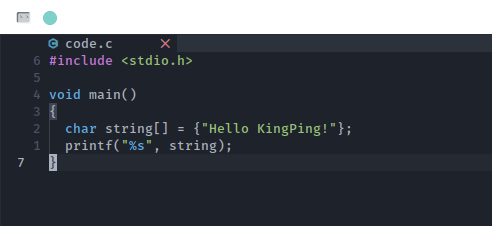
#include <stdio.h>

void main()
{
  char string[] = {"Hello KingPing!"};
  printf("%s", string);
}
Now you can compile it using gcc and with some flags. you should read the manual of gcc before using it.
man gcc
gcc ./code.c -o code -m32 -fno-stack-protector
Flag -o is for the output binary, -m32 for 32bit binary and the last flag -fno-stack-protector is to not impliment a stack overflow protection. you can google more flags and try it yourself. If you will run file command on this binary, you will find that it is 32-bit executable this time.
There are mainly four protections we focus on of a binary and in order to see those you can use the utility of python pwntools called checsec. you can install pwntools using pip.
pip install pwntools
checksec ./code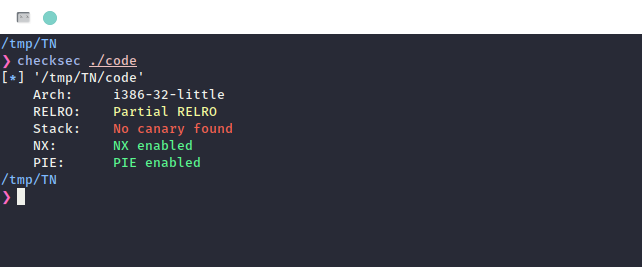
The first protection is RELRO which is quite complicated if you have no idea about binary sections (GOT&PLT) you won’t be able to understand it. If this protections is disabled, attacker can exploit “the lazy binding” process. You can read more on this. The second protection is Stack protection. this is to protect stack overflow. In this proctection the binary checks a random value generated while running the binary before it hits a ret instruction. this random value is called stack cookie and it is stored before the saved return pointer, so that if the return pointer change, this value should be impacted first by the stack overflow. And if the value changes, the execution will stop.
NX stands for non executable stack. It means that we won’t be able to run any shellcode which is stored on stack using buffer overflow. The PIE means that binary will follow the ASLR(Address space layout randomization) if enabled in kernel. It means that address locations will change each time you execute that binary. you can easily enable or disable it in linux.
sudo echo 0 > /proc/sys/kernel/randomize_va_space
sudo echo 1 > /proc/sys/kernel/randomize_va_space
you can check how PIE randomize the memory addresses using ldd command. If a binary is dynamic then It must use libraries from system and you can see the address of that libraries, if its chaning each time you running or being the same address.
ldd ./<binary-name>One thing you should rember that Linux uses little endien. it means that if your input is ABCD as chars, you will see 0x44434241 in the memory(stack/heap).
Now I think we should move on to a debugger, I personally like using GDB with the GEF extension. You can install GEF in simple one line.
bash -c "$(curl -fsSL http://gef.blah.cat/sh)"GEF provides you colorful output, and it also has some extra plugins or you can say commands than any other extension. you can also go for peda, pwndbg etc.
Open your binary in GDB, make sure you are getting a GEF intrepreter. it means you are running a GEF inside GDB. I am not forcing you to use GEF, you can use the normal GDB but in that case you will need to set one or two things. One Thing I can remember is that there are two disassembly flavours(representations). one is called intel flavour and second one is AT&T. I will recommed using intel because most of us can read and uderstand it better that way.

set disassembly-flavor intel #when you are running normal gdbYou can load a file using file command in GDB. or you could just load it when you were starting the gdb giving the filename as argument with gdb. And if the file is using argumets you can set the arguments in GDB using set args command.
We can try to look what are the functions in the binary using info functions command. As we know that the main function is the function what run all other functions, which runs first before all functions (well, not that true but lets see it in this way for now).

we can look into any function using command disassemble main.
The values in the blue color are the address where the function or instructions are stored. It is a 64bit binary thats why you are seeing a 64 bit address if the binary was a 32bit executable, you would see a 32bit address. On the right hand you can see the instructions which are stored on the those addresses and will be executed. There is a register called RIP/EIP(64bit/32bit executable) which holds the value of instruction that is bing executed. In the end of the function, you could see the instruction ret which is basically a instruction to return to the address from where we executed the current function.
We analyze a binary’s mechanism using breakpoints. To set a breakpoint first you need an address where you want to set that breakpoint. And then you can set a breakpoint using break *<address> and simply run the binary using command run. There is one more way to set a breakpoint in gdb, you could just use the offset, like if you want to add a breakpoint at ret instruction, command would be break *main+72.
You can google more commands of gdb, here is a cheatsheet.


")


")

